Chamfering the Roof Rafters
 The roof rafters spread out from the center roof ring like spokes in a wheel, and finally connect to the perimeter wall and door frame. To give the square lumber a more refined profile, the four edges are chamfered for the majority of each rafter's length. Above you can see the final look. The resulting profile of the finished sections is roughly octogonal. The remaining square-profiled section will join to the roof ring. This end will require some tapering work to fit into the mortised holes of the ring, but that comes another day.
Figuring out how to set up a jig for the chamfering took me over an hour. The rough plan for building my yurt is extrapolated from 'The Complete Yurt Handbook'. In the book a jig is setup to nestle a rafter on an angle on the bench so an edge faces up and a planer can be run along the edge to trim it down. My efforts to achieve this were disappointing. I had no great way to clamp down a non-flat edge to the bench, even with batons running along either side of the rafter to prop it up. After fiddling for some time, I noticed a bevel attachment in the box of the planer. Consulting the planer manual on the bevel suggests I can do the chamfering just by clamping the flat face of a rafter to the edge of the bench. I get excited as I set this up because I'm sure it will yield faster, more consistent results.
Here is a rafter clamped to the bench with a bit of paint stick between the clamp and the wood to protect it from marring. Notice that the edge protrudes a bit over the edge of the bench. If the board curves in a little bit along its length and you clamp the end flush to the bench's edge, then the bevel of the planer can hit the table as you work into the curve and it may spoil your cut.

The other end of the board needs to be clamped down so it doesn't move, but notice there is a scrap of wood clamped on top too. We don't want the chamfering to run the full length. In this case, we want it to stop 30 inches from the top of the roof rafter. The stop block is positioned so the foot plate of the planer will hit it when the blades get to 30 inches from the end. Because the foot plate is further out than the blades, you have to measure and check this to get it right.

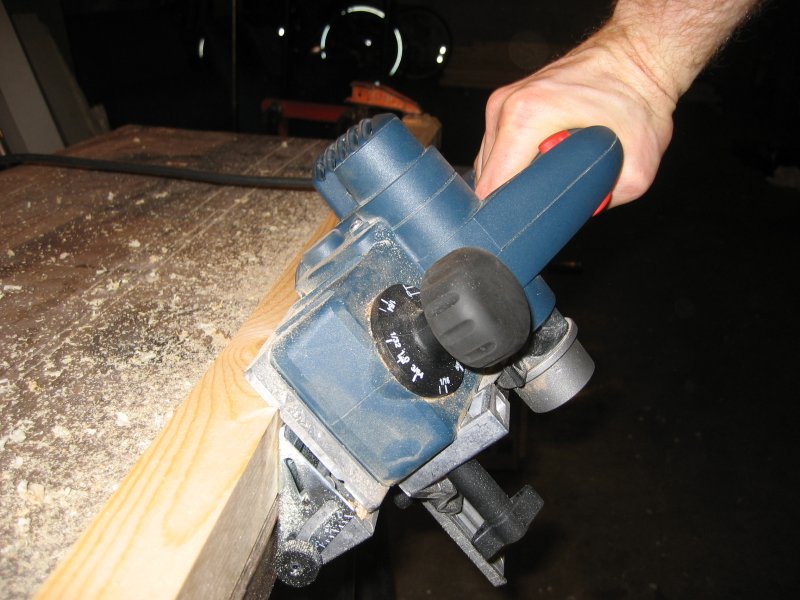
Here you can see the planer in action. Notice the groove in the foot plate that the edge of the board fits into -- this guides the planer and makes this pretty quick work. The bevel guide below the footplate helps a lot as well. After each pass you just unclamp the board, rotate an uncut edge to the outside, reclamp, and cut again.
Next time, cutting the wall slats on a table saw.
posted by yurt boy at 6:27 PM
![]()

1 Comments:
Hey, where is the picture of me yakass? I hope there is a sexy shot of me with the chop saw coming up soon. Those are sexy cutting rigs!
Post a Comment
<< Home