Monday, July 24, 2006

Screwed, Glued, and (not) Tattooed
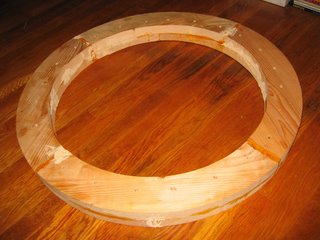

The eight quarter circle sections have now been joined with glue and screws to form a laminated ring. Getting there was a bit bumpy though. Although it may look pretty decent in the photo, notice the lighter colored patches where I've applied wood filler to plug up gaps in the ring caused by warped wood sections. None of the eight sections were perfectly flat, and several were visibly twisted and warped. They were flat enough I thought. The woodworking world was conquered with an armful of clamps and a handful of screws, right?
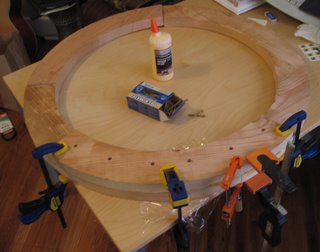
Here is the first clamp and screw job, as it were. In my haste, I forgot the first rule of glueing. Before you take the cap off the glue bottle, make sure every piece, every tool, every paper towel for cleaning your fingers part way through, every detail you can think of, is completely ready to go. For example, it would be poor planning to leave the special driver bit that comes with the fancy exterior wood screws I'm using in the box rather than having it already snug in the drill's chuck. It would also help to have the exact number of screws you need conveniently at hand. I blew it on both of these things and a few more besides. Fortunately, there is a special trick to adjust wood you are glueing together after the glue has begun to set. Simply take a mallet and whack the pieces into place.

Anyway, the first glue up is the most difficult here anyway because you need to make sure your alignment will permit the rest of the pieces to form the best circle. Kind of tricky with a 3' circle of warped boards. I did okay.
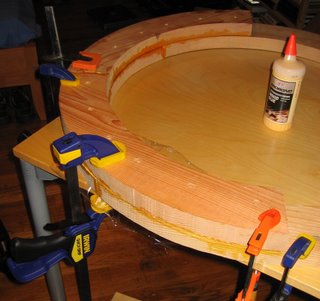

An hour later after the glue has set enough to remove the clamps, I get ready to add another top and lower section to the ring. I am careful to have all my ducks in a row and it goes pretty well. I laid all eight sections together as intended and then traced the edges of the new lower section onto the table with a pencil. This way when I start joining the new pieces to the ring I can verify if the alignment is right (firmly clamping the previously joined ring pieces to the table first is key here to prevent things moving around). Notice that my workbench today is my desk. I needed something big and as flat as possible for this job.


Here goes the third top section. I'm feeling confident and happy now with my results. After the glue dries, just one last section to add. Piece of cake!


Of course I notice that the two lower sections that are below the final upper section are a bit out of alignment. I was pleased at how closely they kiss, but one is about a third of an inch higher than the other. What's worse, they kind of twist in opposite directions. Before glueing, I put the top section in place and find the best locations for all my clamps to force all the mating faces as close to flat as possible. It ain't bad. I trace around the jaws of the clamps so I know exactly where to put them when glueing.

So then I liberally apply glue on all the mating faces and drop the last section into place. I carefully clamp it gradually here and there to pull the three pieces into the same plane with each other without pushing them out of whack in one direction or the other. It's looking great, so I reach for the drill. After putting three screws in on one side to join to the first lower board, I start to drill the other side in. When driving the second screw in, I hear a bad sound.
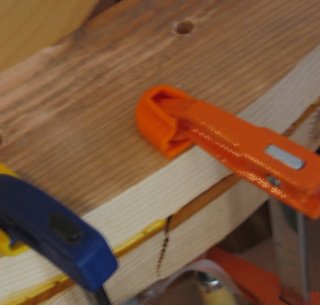

See the crack in the lower part of the ring? The bottom piece has completely split into two fragments. Crap, crap, crap! There was a fair amount of stress on the wood from being torqued against it's will. When the screw went in, the tension was released in a cleavage passing diagonally through the screw's entry point. Here's how it looks from inside the ring.
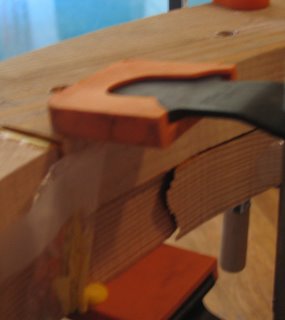

This makes me a mildly unhappy camper. At the last moment, defeat was snatched from the jaws of victory! I assess my options quickly. Half of the section which split is already firmly glued and screwed to the rest of the ring, so swapping it out completely would not be straight-forward. The smaller fragment of this piece is held by one screw and a decent amount of glue, so I decide to patch up the crack later.

Today I filled all the minor gaps and this big crack with some wood filler. I thought the filler was supposed to be strong, but after applying it I now think it would have been better to just stuff in a small scrap of wood cut to fit the crack and glue the whole mess up. My plan now is to reinforce this section with some metal bracing on the inside or wrapped around like a band. Wish me luck.

Sunday, July 16, 2006

Real Mongolian Gers

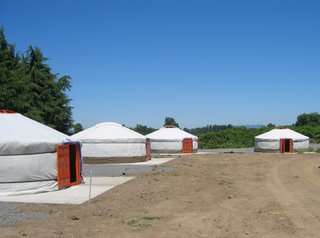
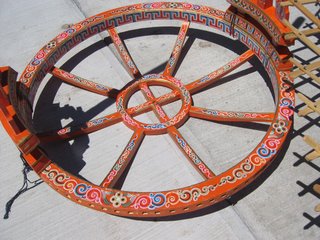
Today I had the great pleasure of seeing some authentic gers imported from Mongolia. Last week at a Burning Man work party, I was talking to a guy about my yurt project and he told me there were a bunch of imported yurts on Sauvie Island. I already had plans with some friends to go to the island today to pick blueberries, so afterwards Suzi and I drove further up the island to find the gers. By the way, ger (rhymes with 'hair') is just another name for yurt -- although I think ger is what the Mongolians call them. Anyway, when we pulled up to the camp ground where they are located, I was excited to see a big cluster of them. I could also see two gers in the process of being erected, so we could examine the roof ring and roof poles up close. You can see part of the wall lattice to the right of the ring in this photo:


These gers are being permanently set up on concrete slabs. They are part of a private camp ground where you can rent a yurt or a tent site. Next to the ring were all the roof poles:

I had called the camp ground a few days ago to ask if it was okay to stop by just to check out the yurts, and they didn't mind. Luckily for us, the yurts were not secured and we could go inside them. The built-in sky light is dramatic:


The two supports below the roof ring are not structurally necessary, and my yurt will not have them. Although they can be beautifully carved and decorated I want uninterrupted open space inside my yurt. While we were inside checking it out, Suzi commented that it was much cooler than she expected. It was a pretty hot day today. I had read that letting up the cover of a yurt a little bit on the sides provides excellent ventilation because the cooler air comes in from the bottom and the hot air rises and leaves the yurt through the open top. This yurt didn't have the cover raised, but the door was open when we got there and that must be enough. There was another ger with the roof ring covered and the door closed, and it was much warmer inside it. I was thrilled to know the yurt can get good ventilation on the playa where the heat can get much hotter!


I took a ton of photos, including many close ups of details I was interested in copying. I learned how the walls are attached to the door frame and how the cover is tied as well. The doors are bright and beautifully painted. My yurt will be bright red instead of orange, but I hope to do some detail painting as well. In the above photo you can see the light from the roof ring shining onto the floor of the yurt. After living in a yurt for a while, you can tell the time of day just by where the light strikes the walls and floor!


In all we counted 11 gers, including the two that were not completely set up yet. After a good spell of blueberry picking and some prancing about to take these pictures, the sun was just too much for me and I started to feel some heat stroke coming on. Even with sun block on my bald head, I think a hat is a must for me to protect my brains from cooking. I let Suzi drive us back to the city. She gave me some headache pill and after some fluids and a nap, I was able to function again by the late afternoon. As I slept, my dreams danced with views like this last one.

Wednesday, July 12, 2006

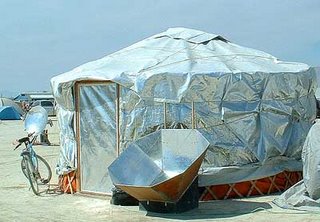
Other Playa Yurts


The main impetus for my yurt project is to bring it to Burning Man. After last year I was thinking about buying a geodesic dome until my friend Alexis told me I should just make a yurt instead. As many people as I meet now who are familiar with yurts, I am so surprised it was the first time I had heard of them. Obsession came on very quickly. Fast forward nine months and I'm finally heeding the fabulous advice of Alexis.

Anyway, I was certain my yurt wouldn't be the first one on the playa but it wasn't until tonight that I stumbled upon examples of those who came before. Very cool stuff, but I was relieved to notice that the traditional style I'm going for wasn't represented. Perhaps I am breaking new ground in some small way.

Saturday, July 08, 2006

One Ring to Bind Them


The roof ring of a yurt is the least forgiving component to construct. The walls and roof poles need to be the right length and shaped and connected roughly as intended by the Mongolian geniuses who designed the yurt 2000 years ago, but my sense is that a few errors aren't likely to spoil the whole works. In fact part of the brilliance of the design is that the strength of the yurt isn't appreciably compromised by a few broken or missing roof rafters or wall slats. However, without a well-crafted roof ring in good repair, the yurt simply cannot be erected at all and your family will die from exposure to the harsh Mongolian winter. No wonder then that the roof ring is considered sacred and hence is treated with great respect. So naturally, it is with some trepidation and a great deal of care that I have been preparing my roof ring. Let's look at the steps to create the basic pieces (mostly pictured above) before assembly.

Today's featured 'yurt hero' is Mr. Matt. He is threatening to join me in the workshop for some hands on yurt-crafting, but so far it has been his prowess in materials procurement that has shined. Some weeks back I mentioned in passing to Matt that I was looking for a very large sheet of heavy card stock to make templates for the roof ring. A few hours later my phone rings and Matt reports that TWO large sheets of foam core board had been rescued on my behalf from certain dumping in the land fill.


Above you can see the template for a quarter section of the main roof ring drawn and cut out of one recycled convention booth poster. Two concentric circles are drawn on the board and then divided into equal quarters. It's handy to draw the whole 34" ring so after cutting out the template you can compare the template to the other three sections and verify it is exactly a quarter of the ring. Foam core, it turns out, makes exceedingly durable templates. The only caveat is that when using a craft knife to cut it out you are likely to make cuts at angles such that the bottom of the template isn't as accurate as the top face. But if you use the top side of the template when tracing your shapes onto the lumber, this need not be a problem.


It is easier to see the lines drawn on the board above, which lay out the template for the smaller, raised circle of the roof ring. My technique to draw circles was to attach thumb tacks to a large ruler. This allows easy control over the distance from the center to the edge of the circle being drawn. The pokey part of the tack penetrates the foam board and provides a solid anchor for the center of the circle. The other tack can then be swung around to etch out the circle in the paper surface of the board.

Once you've made all your templates, it's time to trace out your pieces in the lumber. In order to cut each section out of a single piece of wood, I had to get some very wide timber. I'm using 2x12 kiln-dried Douglas Fir. You must use stable, seasoned wood for the crown -- which is a little harder to source than green wood in such a wide board. I originally estimated a 16' board would be sufficient for cutting all the sections I needed. However in practice the location of knots and warping at the ends of the board decreased the usable wood and I had to buy an additional 10' board. Fortunately they weren't too expensive. This whole roof crown would have cost a small fortune though if I used the recommended oak, maple or beech hard wood. You would probably also have to glue together narrower boards to make panels large enough in these woods -- making it more labor-intensive as well.


Laying out the sections in the lumber requires some creativity to avoid ugly knots, cracks, and other problems. I had originally planned to use a jigsaw for rough-cutting the sections out, but I was so unhappy with the results on my first try that I began a serious search for a band saw. The North Portland Tool Library has just about every tool I need to complete my project, but a band saw isn't a very practical item for folks to carry home and then return to the library at the end of the week. Fortunately, tapping into the local Burning Man community yielded a band saw fairly quickly. More on that adventure next time.

Tuesday, July 04, 2006

Slat-a-licious!


I chose to celebrate the 4th this year by working on my independence from conventional housing structures. After a one-two punch of successive parties the night before with JT in town, drinking around the barbie wasn't high on my agenda. I also had previous arrangements with my friend Cage to borrow his contractor-grade table saw. In addition to providing this material support, Cage has also been generous in dispensing all the right answers to my woodworking queries. He is a highly skilled independent contractor and a useful sage to a relative novice like me embarking on this yurt adventure. Any Portland-area homeowners doing a little renovation would be well-advised to get Cage on the job!

Today I'm working on the yurt wall. My 2x2 boards need to be split in half lengthwise to form the wall slats. At first I was a wee nervous that my wood would crack and split out near knots while being run through the table saw. I spent a lot of time earlier sorting the wood and reserving the straightest, least knotty wood for the wall slats. In the end I didn't lose any wood to breakage or splits. My fears were overblown, but I know my resulting slats are more uniform and stronger because of my sorting efforts. Running curved or warped boards through the table saw would also have risked greater chances of dangerous pinches and kick-backs.


I didn't take any pictures of the table saw work because I was in a hurry to finish up and meet JT for lunch before he headed back to Seattle for the rest of his conference. However, above is a sexy photo of Steve cutting wall slats to length for all those ladies reading the blog! While I was splitting the wood into 1x2 slats in the morning I got a call from Steve, eager to lend a hand with the yurt. We made plans to work in the afternoon after I had lunch with JT and returned the table saw to Cage. Splitting boards into slats on the table saw was actually about the quickest work on the project so far. The long table on the output side of Cage's setup meant that my 8' boards were well-supported for the whole cut and I was able to zip them through very efficiently. The saw performed like the pro it is, but the fine dusting of wood particles all over the basement took a long time to sweep up!

When I reconvened with Steve, he got right to work on cutting the wall slats to their final length. On my first day with the chop saw I had begun to cut wall boards to their final 6'6" length before splitting them into slats. But then I spoke with Cage and he advised to hold off. This voice of experience was wise. There was splintering and minor issues on the ends of some slats after splitting, and I was glad to be able to trim them off while cutting slats to size.

As I walked Steve through the various components of the project and the current stage of each, he got that boy-like excitement that has been driving my efforts. Steve is always enthusiastic anyway, and expressed interest in helping with the yurt from the moment he first heard about the project. Our friend Matt celebrated his 30th birthday out on the Oregon coast in rented yurts for his cleverly dubbed 'Yurty Thirty' party. I wasn't living here at the time, so until my yurt is completed I have to be jealous of Matt and Steve for actually having seen and slept in a yurt.

Anyway, Steve and I finish the work and sweep up in a few hours before heading to the Rogue Brewery for dinner. Although he is the one helping me, Steve pays for my meal. Once it is time for the yurt-raising, a place at the back of the yurt -- where honored guests are seated -- will be reserved for Steve. Actually, it might be crowded back there with Cage and all the other people helping me out along the way!

Sunday, July 02, 2006

Chamfering the Roof Rafters

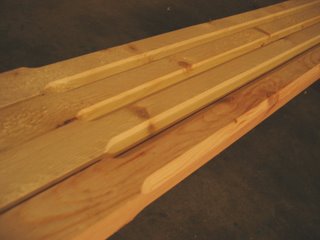
The roof rafters spread out from the center roof ring like spokes in a wheel, and finally connect to the perimeter wall and door frame. To give the square lumber a more refined profile, the four edges are chamfered for the majority of each rafter's length. Above you can see the final look. The resulting profile of the finished sections is roughly octogonal. The remaining square-profiled section will join to the roof ring. This end will require some tapering work to fit into the mortised holes of the ring, but that comes another day.

Figuring out how to set up a jig for the chamfering took me over an hour. The rough plan for building my yurt is extrapolated from 'The Complete Yurt Handbook'. In the book a jig is setup to nestle a rafter on an angle on the bench so an edge faces up and a planer can be run along the edge to trim it down. My efforts to achieve this were disappointing. I had no great way to clamp down a non-flat edge to the bench, even with batons running along either side of the rafter to prop it up. After fiddling for some time, I noticed a bevel attachment in the box of the planer. Consulting the planer manual on the bevel suggests I can do the chamfering just by clamping the flat face of a rafter to the edge of the bench. I get excited as I set this up because I'm sure it will yield faster, more consistent results.

Here is a rafter clamped to the bench with a bit of paint stick between the clamp and the wood to protect it from marring. Notice that the edge protrudes a bit over the edge of the bench. If the board curves in a little bit along its length and you clamp the end flush to the bench's edge, then the bevel of the planer can hit the table as you work into the curve and it may spoil your cut.


The other end of the board needs to be clamped down so it doesn't move, but notice there is a scrap of wood clamped on top too. We don't want the chamfering to run the full length. In this case, we want it to stop 30 inches from the top of the roof rafter. The stop block is positioned so the foot plate of the planer will hit it when the blades get to 30 inches from the end. Because the foot plate is further out than the blades, you have to measure and check this to get it right.


Here you can see the planer in action. Notice the groove in the foot plate that the edge of the board fits into -- this guides the planer and makes this pretty quick work. The bevel guide below the footplate helps a lot as well. After each pass you just unclamp the board, rotate an uncut edge to the outside, reclamp, and cut again.


Next time, cutting the wall slats on a table saw.

Saturday, July 01, 2006

Wood Sort and Trim

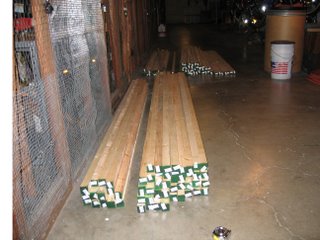
First stop today was the North Portland Tool Library. This wonderful non-profit loans tools from an astoundingly large and complete library to any resident in North Portland. Luckily that includes me. I check out a chop saw, an electric planer, and two clamps. Total cost: free.


As I unbundle my big stack of sticks, it occurs to me that my first step should be to sort the wood. Many people do not realize that since wood is organic, it moves and bends as it dries or if exposed to moisture. As a beginning woodworker this was a great source of frustration for me. But wood does not come from a factory, it is grown. It may well pass through a factory to be processed, but that's another story. Anyway, each piece is unique and may present different challenges for the woodworker. I'm concerned primarily about large knots and warped boards.

Taking a few sticks at a time on the concrete floor of the basement, I turn them over and over and assess their quality. Excellent specimens go in one stack. Damaged lumber with large knots or dangerous splits go in another. The curved and warped boards go in the last pile. Unfortunately, the last two piles get most of the boards.

Thirty minutes into the sorting, I have to start over. I realize the basement floor where I'm sorting is far from flat! It's a rather old building and it has settled. It turns out the fastest way to sort them anyway is to just compare a dozen boards to each other and the odd ones kind of jump out. Here are some of the damaged pieces:


Since the wall slats for my yurt only need to be six and a half feet tall and the boards are 8', damage on the ends can simply be cut off. Damage in the middle is a different story. The most dismal wood that can't easily be salvaged is set aside. It may have some use down the road. Fortunately, I bought 5% more wood than is required to allow for wastage just like this.

Wall slats will be made by splitting these boards in half lengthwise. Although some knots may not be so bad in the 2x2, it may weaken one of the two slats once split. These boards I reserve for use as rafter poles -- since they will not be split. The curvy and warped boards are likely to become roof rafters too because I fear they can't be evenly split on the table saw later on.

After sorting, I use the chop saw to trim the rafter poles to exactly 8'. On average each board has an extra half inch. Both ends of each stick are painted green, so I try to shave off the extra a bit from each side so the final ends are bare wood. There is a staple in one end of each stick too, so I pull these out first. The staple end of the wood destined for the wall is just trimmed off since I have so much extra length for them.

The sorting took way longer than I expected, but I feel good about my progress and call it a night.